Verify SSL/TLS Certificate Signature
Introduction
If you’ve read/heard about digital signatures, openssl, public key cryptography, https or tls, you may have wondered
- “How does my browser use these signatures?”
- “How does my browser verify these digital signatures?”
- “When amazon.com provides a digital certificate, how and why does my browser trust it?”
This article lets us take the reins of browser and be the verification guard
using openssl tools. Let’s try to understand what goes behind the scenes of
a browser’s certificate signature verification.
Prerequisites
- Linux based machine
- OpenSSL (it’s usually installed on linux based machines)
First of all, why should we (as in browsers) verify?
Let’s say we’ve read about uses of Diffie-Hellman, RSA1 public key
cryptography, AES-CBC2 and hash algorithms. Now, if we were supposed to
design a secure architecture to browse amazon.com, our thought process would
be something like:
- “Hmm, let me see… First of all, I need to encrypt my passwords, credit card info etc, so I need a key to encrypt. The server also needs to have the same key to decrypt my content and to encrypt the data it sends me”
- “However, it’s impractical to visit Amazon Seattle HQ and get a key exchanged. It’s also ridiculously idiotic to trade our secret key as plaintext on internet. It’s as good as handing out the key to anyone listening to our connection. I need a secure key exchange protocol like DHKE3!”
- “If I can trade my DH4 public parameters with amazon.com, we (server and I) can securely generate our own little shared secret key and we can use that to encrypt/decrypt stuff”
- “Whoops! If I receive DH public parameters as plaintext on internet, the person listening to our connection in starbucks could also send me those parameters and I could end up trading keys with him! That’s bad!”
- “IDEA!! Is this the best idea or what! What if amazon.com can share it’s
public key with me, sign DH parameters using it’s private key! Now, when
I decrypt using amazon’s public key, I can be 100% sure that amazon.com
had signed it using it’s private key and nobody else! YAY!! Problem
solved!”
(After a few minutes …) - “I think I celebrated a little early! I think we’re back to the same problem. What if this impersonator in my network sends me a public key and claims that amazon.com sent it? How do I verify??”
This is where we need a “Trusted Third Party/Certificate Authority/CA)”. CA computes a hash over all the certificate data (except signature) and encrypts the hash with it’s private key.
[Q] Why was the signature excluded from hash?
[A] CA doesn’t have a time machine to go into the future and see what signature
would be generated. If it did, it would sign the entire certificate including
the future signature.
FYI: Encrypting the hash is called signing. This is how a signature is generated. We can’t know the signature beforehand to sign it.
[Q] So, the signature is delivered separately to clients?
[A] No, it’s part of the certificate. All of the data you need to validate the
server’s identity is contained in the certificate (including the signature).
So, you need to remove the signature field before computing the hash and
verifying.
[Q] What data is signed??
[A] Entity’s identity, validity, extensions, public key and a lot of
other data related to entity is signed by the CA.
If any parts of the certificate are modified by a man-in-the-middle, the CA’s
signature will not validate.
Basic structure of a X.509 certificate
The basic structure of a certificate is shown in the specification for X.509 certificates on the Internet, RFC5280.
X.509 v3 certificate basic syntax:
   Certificate  ::=  SEQUENCE  {
        tbsCertificate       TBSCertificate,
        signatureAlgorithm   AlgorithmIdentifier,
        signatureValue       BIT STRING  }
| label | meaning |
|---|---|
| tbsCertificate | The field contains the names of the subject and issuer, a public key associated with the subject, a validity period, and other associated information |
| signatureAlgorithm | Identifier for the cryptographic algorithm used by the CA to sign this certificate |
| signatureValue | Digital signature computed upon the ASN.1 DER encoded tbsCertificate |
tbs: to be signed
Consider tbsCertificate, signatureAlgorithm, signatureValue as custom data types (struct) with other fields.
So, Certificate has a SEQUENCE. A SEQUENCE contains an ordered field of one or more types. It is encoded into a TLV triplet that begins with a Tag byte of 0x30. tbsCertificate and signatureAlgorithm also have a SEQUENCE.
TBSCertificate  ::=  SEQUENCE  {
        version         [0]  EXPLICIT Version DEFAULT v1,
        serialNumber         CertificateSerialNumber,
        signature            AlgorithmIdentifier,
        issuer               Name,
        validity             Validity,
        subject              Name,
        subjectPublicKeyInfo SubjectPublicKeyInfo,
        issuerUniqueID  [1]  IMPLICIT UniqueIdentifier OPTIONAL,
                             -- If present, version MUST be v2 or v3
        subjectUniqueID [2]  IMPLICIT UniqueIdentifier OPTIONAL,
                             -- If present, version MUST be v2 or v3
        extensions      [3]  EXPLICIT Extensions OPTIONAL
                             -- If present, version MUST be v3
        }

AlgorithmIdentifier  ::=  SEQUENCE  {
        algorithm               OBJECT IDENTIFIER,
        parameters              ANY DEFINED BY algorithm OPTIONAL  }
Just to get a glimpse of how this data is structured, it’s probably a good time to take a look at the super helpful ASN.1 decoder by Lapo Luchini.
-
Download a sample google certificate in PEM format from here
-
Upload the file on ASN.1 JavaScript decoder and observe the hierarchy
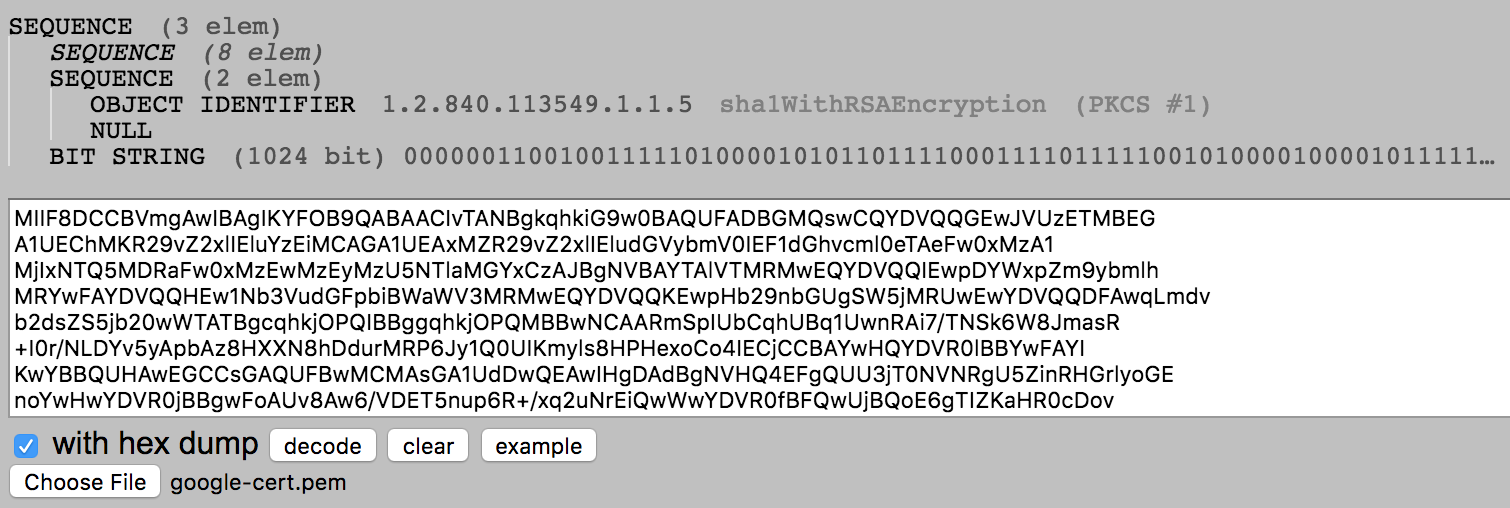
The top level SEQUENCE has 3 fields (SEQUENCE, SEQUENCE, BIT STRING) which corresponds to tbsCertificate, signatureAlgorithm and signatureValue respectively.
In this certificate:
-
TBSCertificate lives at offset 4
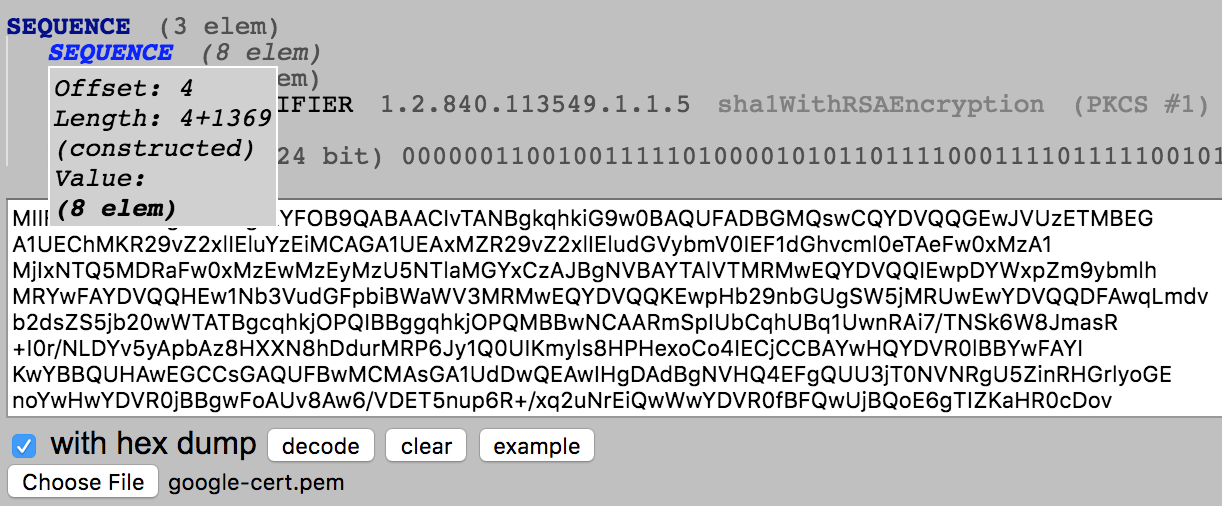
-
AlgorithmIdentifier lives at offset 1377
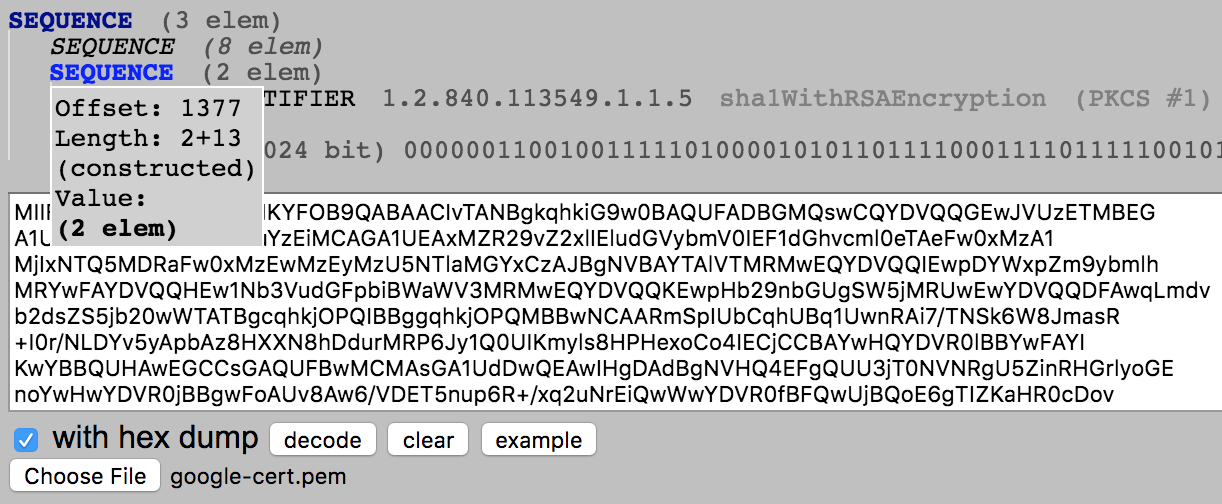
-
signatureValue lives at offset 1392
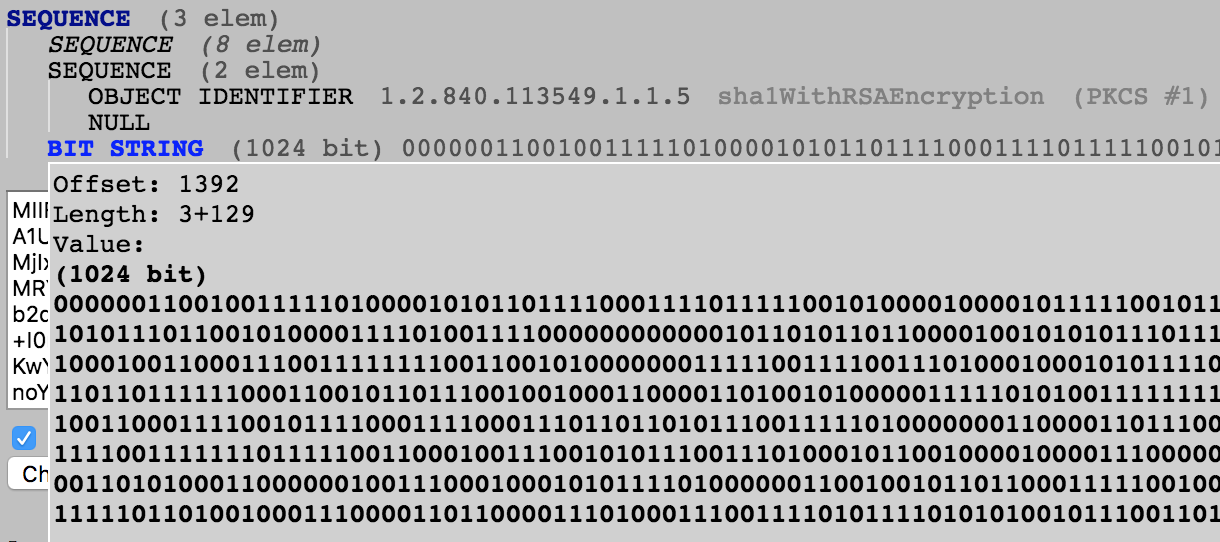
You can confirm the same using
openssl asn1parsetool as well (Shown later in this article)
In order to verify that a certificate was signed by a specific CA, we would need to possess the following:
- Public key of the CA (issuer)
- Signature and Algorithm used to generate the signature
Verifying server’s public key
-
Download the server’s certificates to
/tmpin PEM format.$ openssl s_client -connect stackoverflow.com:443 -showcerts 2>/dev/null </dev/null \ | sed -n '/-----BEGIN/,/-----END/p' > /tmp/stackoverflow-certs.crtCommand options:
s_client: Implements a generic SSL/TLS client which connects to a remote host using SSL/TLS-connect: Specifies the host and optional port to connect to-showcerts: Displays the server certificate list as sent by the server2>/dev/null: redirects stderr to/dev/null< /dev/null: instantly send EOF to the program, so that it doesn’t wait for input/dev/nullis a special file that discards all data written to it, but reports that the write operation succeededsed: stream editor for filtering and transforming text-n: suppress automatic printing of pattern spacePEM (Privacy Enhanced Mail) is nothing more than a base64-encoded DER (Distinguished Encoding Rules)
[Q] I thought a server has one certificate, what are these other certificates that we’re downloading?
[A] You are right, server always needs to show just one certificate. The other certificates are the intermediary and probably root CA certificates. We need those to get the intermediary public keys (Issuer’s public key)
The above openssl command creates a file in this format:
$ cat /tmp/stackoverflow-certs.crt
-----BEGIN CERTIFICATE-----
MIIIPDCCBySgAwIBAgIQB2XGTnTlkdaAOcoqhHVj8DANBgkqhkiG9w0BAQsFADBw
MQswCQYDVQQGEwJVUzEVMBMGA1UEChMMRGlnaUNlcnQgSW5jMRkwFwYDVQQLExB3
...
aVnw9vahqf7nKHHcC2VRTUgkQfn9yDmmBOo0nQ8Xgfpd65/PaxVfBnuKfEkXBfpM
-----END CERTIFICATE-----
-----BEGIN CERTIFICATE-----
MIIEsTCCA5mgAwIBAgIQBOHnpNxc8vNtwCtCuF0VnzANBgkqhkiG9w0BAQsFADBs
...
/D6q1UEL2tU2ob8cbkdJf17ZSHwD2f2LSaCYJkJA69aSEaRkCldUxPUd1gJea6zu
xICaEnL6VpPX/78whQYwvwt/Tv9XBZ0k7YXDK/umdaisLRbvfXknsuvCnQsH6qqF
0wGjIChBWUMo0oHjqvbsezt3tkBigAVBRQHvFwY+3sAzm2fTYS5yh+Rp/BIAV0Ae
cPUeybQ=
-----END CERTIFICATE-----
There’s a
bashone-liner magic that can extract certificates in their own files:$ openssl s_client -showcerts -verify 5 -connect stackoverflow.com:443 < /dev/null | awk '/BEGIN/,/END/{ if(/BEGIN/){a++}; out="cert"a".crt"; print >out}' && for cert in *.crt; do newname=$(openssl x509 -noout -subject -in $cert | sed -n 's/^.*CN=\(.*\)$/\1/; s/[ ,.*]/_/g; s/__/_/g; s/^_//g;p').pem; mv $cert $newname; doneCommand credits: stackoverflow.com The above command will create the following for
stackoverflow.com:$ openssl s_client -showcerts -verify 5 -connect stackoverflow.com:443 < /dev/null | awk '/BEGIN/,/END/{ if(/BEGIN/){a++}; out="cert"a".crt"; print >out}' && for cert in *.crt; do newname=$(openssl x509 -noout -subject -in $cert | sed -n 's/^.*CN=\(.*\)$/\1/; s/[ ,.*]/_/g; s/__/_/g; s/^_//g;p').pem; mv $cert $newname; done verify depth is 5 depth=1 C = US, O = DigiCert Inc, OU = www.digicert.com, CN = DigiCert SHA2 High Assurance Server CA verify error:num=20:unable to get local issuer certificate verify return:1 depth=1 C = US, O = DigiCert Inc, OU = www.digicert.com, CN = DigiCert SHA2 High Assurance Server CA verify error:num=27:certificate not trusted verify return:1 depth=0 C = US, ST = NY, L = New York, O = "Stack Exchange, Inc.", CN = *.stackexchange.com verify return:1 poll error $ ls -la total 16 drwxr-xr-x 4 <username> <groupname> 128 Mar 11 13:22 . drwxr-xr-x 16 <username> <groupname> 512 Mar 11 13:22 .. -rw-r--r-- 1 <username> <groupname> 1688 Mar 11 13:22 DigiCert_SHA2_High_Assurance_Server_CA.pem -rw-r--r-- 1 <username> <groupname> 2914 Mar 11 13:22 stackexchange_com.pemOR
If you’re uncomfortable using that one-liner, that’s fine too. 2 more steps and we will get the same output.
-
Download all the certificates offered by server to a file
/tmp/stackoverflow-certs.crt$ openssl s_client -connect stackoverflow.com:443 -showcerts 2>/dev/null \ </dev/null | sed -n '/-----BEGIN/,/-----END/p' > /tmp/stackoverflow-certs.crt*.crtis just an extension to identify it as certificate but the file is of PEM typeJust copy the contents between
-----BEGIN CERTIFICATE-----and-----END CERTIFICATE-----(including these delimiters) into their own files. In this case, I have 2 sections with those delimiters and hence I will create 2 files$ ls -la stackoverflow* -rw-rw-r-- 1 <username> <groupname> 1688 Mar 11 13:28 stackoverflow.1.crt -rw-rw-r-- 1 <username> <groupname> 2914 Mar 11 13:29 stackoverflow.2.crt -rw-rw-r-- 1 <username> <groupname> 4602 Mar 11 12:03 stackoverflow-certs.crt -
Look for the subject names and rename the certificates for easy identification
$ openssl x509 -in stackoverflow.1.crt -subject -noout
subject= /C=US/O=DigiCert Inc/OU=www.digicert.com/CN=DigiCert SHA2 High Assurance Server CA
$ openssl x509 -in stackoverflow.2.crt -subject -noout
subject= /C=US/ST=NY/L=New York/O=Stack Exchange, Inc./CN=*.stackexchange.com

$ mv stackoverflow.1.crt DigiCert_SHA2_High_Assurance_Server_CA.crt
$ mv stackoverflow.2.crt stackexchange.crt

$ ls -la *.crt
-rw-rw-r--  1 <username>  <groupname>  1688 Mar 11 13:28 DigiCert_SHA2_High_Assurance_Server_CA.crt
-rw-rw-r--  1 <username>  <groupname>  2914 Mar 11 13:29 stackexchange.crt
-rw-rw-r-- 1 <username>  <groupname> 4602 Mar 11 12:03 stackoverflow-certs.crt
FYI: You can also do this process in GUI but with the ever changing UI landscapes and increasing number of browser options, it’s just hard to keep an article up-to-date with those changes and ways to download certificates from a website.
-
-
Make sure you have the issuer certificate of
stackoverflow.comcertificate$ openssl x509 -in stackexchange.crt -noout -issuer issuer= /C=US/O=DigiCert Inc/OU=www.digicert.com/CN=DigiCert SHA2 High Assurance Server CAThe issuer is
DigiCert SHA2 High Assurance Server CAand we have issuer’s certificateDigiCert_SHA2_High_Assurance_Server_CA.crtwhich has issuer’s public key -
Obtain Issuer’s public key
$ openssl x509 -in DigiCert_SHA2_High_Assurance_Server_CA.crt -noout \ -pubkey > issuer-pub.pem $ cat issuer-pub.pem -----BEGIN PUBLIC KEY----- MIIBIjANBgkqhkiG9w0BAQEFAAOCAQ8AMIIBCgKCAQEAtuAvwiQGyG0EX9fvCmQG sn0iJmUWrkJAm87cn592Bz7DMFWHGblPlA5alB9VVrTCAiqv0JjuC0DXxNA7csgU nu+QsRGprtLIuEM62QsL1dWV9UCvyB3tTZxfV7eGUGiZ9Yra0scFH6iXydyksYKE LcatpZzHGYKmhQ9eRFgqN4/9NfELCCcyWvW7i56kvVHQJ+LdO0IzowUoxLsozJqs KyMNeMZ75l5xt0o+CPuBtxYWoZ0jEk3l15IIrHWknLrNF7IeRDVlf1MlOdEcCppj GxmSdGgKN8LCUkjLOVqituFdwd2gILghopMmbxRKIUHH7W2b8kgv8wP1omiSUy9e 4wIDAQAB -----END PUBLIC KEY-----Where,
x509: display certificate information, convert certificates to various forms, sign certificate requests or edit certificate trust settings -in: input filename to read a certificate from -noout: prevents output of the encoded version of the certificate -pubkey: Outputs the certificate\'s SubjectPublicKeyInfo block in PEM format -
Get the signature of certificate in binary format
The default behavior of the following command is to print all fields
$ openssl x509 -in stackexchange.crt -noout -textHowever, there are command line options to specify which fields should be excluded while printing
$ openssl x509 -in stackexchange.crt -text -noout -certopt ca_default \ -certopt no_validity -certopt no_serial -certopt no_subject \ -certopt no_extensions -certopt no_signame Signature Algorithm: sha256WithRSAEncryption 00:93:ce:f7:ff:ed:90:b3:02:9f:25:24:27:fa:26:5e:65:cf: 2e:88:68:3d:f6:99:9d:d3:4f:04:d9:c9:86:12:ba:8d:cc:f7: 25:2b:d2:0d:6c:f8:f0:c6:5f:73:22:04:dc:5e:91:7f:52:d0: 55:55:2d:59:ed:7a:3c:de:a7:ec:18:c3:dd:33:36:2d:dc:5f: a1:42:94:18:2e:19:46:17:ee:49:7f:6c:7a:65:bd:73:8d:3f: da:33:71:8c:74:68:be:e8:e3:d5:f9:81:e5:ff:08:14:7b:8e: 4d:ea:44:6e:0d:99:d5:2f:5e:bb:f9:6d:e5:da:70:fe:99:28: 4e:ff:bc:6a:c0:78:99:bb:3d:06:1f:20:47:46:9e:62:e3:76: e5:1f:4b:e0:eb:bb:09:f2:0b:8d:f3:5a:5a:a6:ea:58:da:fe: fc:15:cb:d1:f2:3d:04:2d:f8:32:7a:1b:56:a6:31:77:bf:32: 92:ab:fa:d8:da:c3:17:4d:8c:d2:3e:a3:1e:92:cb:1e:1c:d8: 52:31:85:3a:5b:0f:61:f6:9c:8c:69:59:f0:f6:f6:a1:a9:fe: e7:28:71:dc:0b:65:51:4d:48:24:41:f9:fd:c8:39:a6:04:ea: 34:9d:0f:17:81:fa:5d:eb:9f:cf:6b:15:5f:06:7b:8a:7c:49: 17:05:fa:4cWhere,
x509: display certificate information, convert certificates to various forms, sign certificate requests or edit certificate trust settings -in: input filename to read a certificate from -noout: prevents output of the encoded version of the certificate -text: Prints out the certificate in text form. Full details are output including the public key, signature algorithms, issuer and subject names, serial number any extensions present and any trust settings -certopt: Customise the output format used with -textThe output tells us that the certificate was hashed using
SHA256. However, the output you see is in hex and is separated by:. Let’s remove the first line, colon separator and spaces to get just the hex part$ SIGNATURE_HEX=$(openssl x509 -in stackexchange.crt -text -noout -certopt ca_default -certopt no_validity -certopt no_serial -certopt no_subject -certopt no_extensions -certopt no_signame | grep -v 'Signature Algorithm' | tr -d '[:space:]:') $ echo $SIGNATURE_HEX 0093cef7ffed90b3029f252427fa265e65cf2e88683df6999dd34f04d9c98612ba8dccf7252bd20d6cf8f0c65f732204dc5e917f52d055552d59ed7a3cdea7ec18c3dd33362ddc5fa14294182e194617ee497f6c7a65bd738d3fda33718c7468bee8e3d5f981e5ff08147b8e4dea446e0d99d52f5ebbf96de5da70fe99284effbc6ac07899bb3d061f2047469e62e376e51f4be0ebbb09f20b8df35a5aa6ea58dafefc15cbd1f23d042df8327a1b56a63177bf3292abfad8dac3174d8cd23ea31e92cb1e1cd85231853a5b0f61f69c8c6959f0f6f6a1a9fee72871dc0b65514d482441f9fdc839a604ea349d0f1781fa5deb9fcf6b155f067b8a7c491705fa4cConvert the signature to binary
$ echo ${SIGNATURE_HEX} | xxd -r -p > stackexchange-signature.binWhere,
xxd: makes a hexdump or does the reverse-r: convert hexdump into binary.-p: plain hexdump styleWe need to use the combination
-r-pto read plain hexadecimal dumps without line number information and without a particular column layout.OR
If you prefer a straightforward command-line to obtain your signature in binary:
-
Find out the offset where RSA signature lives in the certificate:
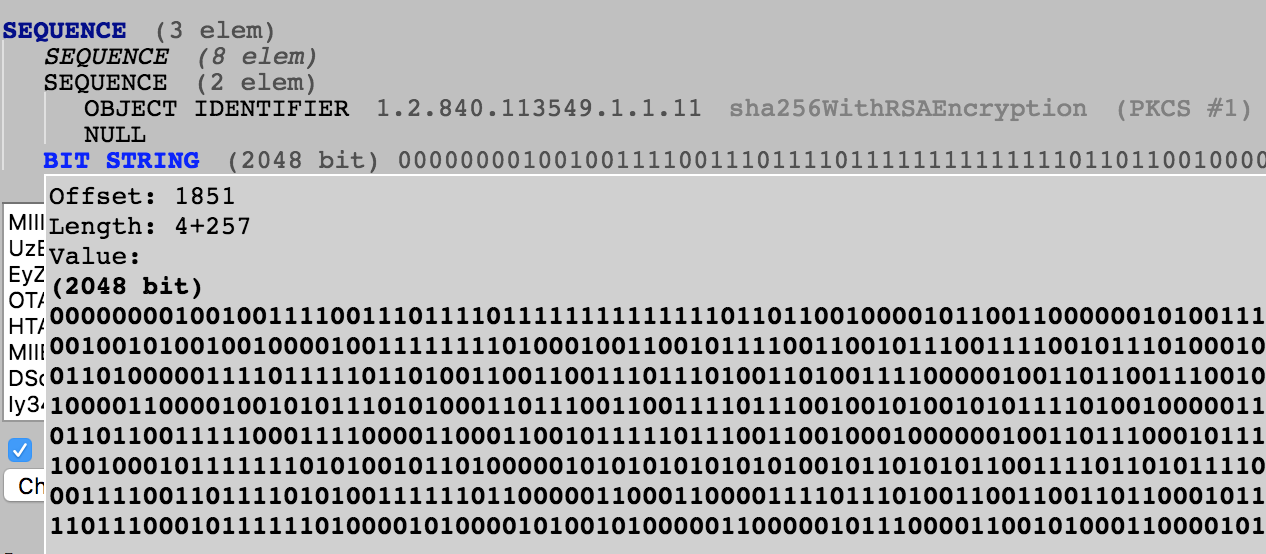
$ openssl asn1parse -in stackexchange.crt ... 1836:d=1 hl=2 l= 13 cons: SEQUENCE 1838:d=2 hl=2 l= 9 prim: OBJECT :sha256WithRSAEncryption 1849:d=2 hl=2 l= 0 prim: NULL 1851:d=1 hl=4 l= 257 prim: BIT STRING -
You can also use https://lapo.it/asn1js to verify where your BIT STRING starts
-
In my example, the signature begins at an offset of
1851. There is no other section/content below it. So you can safely consume everything from offset1851and it will be the signature bytes$ openssl asn1parse -in stackexchange.crt -strparse 1851 -out stackexchange-signature.bin Error in encoding 140545980245696:error:0D07207B:asn1 encoding routines:ASN1_get_object:header too long:asn1_lib.c:157: $ file stackexchange-signature.bin stackexchange-signature.bin: dataI’ve no idea why that throws up that encoding error but the signature dump is successful.
-
-
Use issuer’s public key (Remember the issuer signed the server certificate using the corresponding private key) to decrypt the signature.
$ openssl rsautl -verify -inkey issuer-pub.pem -in stackexchange-signature.bin -pubin > stackexchange-signature-decrypted.binWhere,
rsautl: command can be used to sign, verify, encrypt and decrypt data using the RSA algorithm -verify: verify the input data and output the recovered data -inkey: the input key file -in: input filename to read data from -pubin: input file is an RSA public key -
The decrypted signature is in binary again. The decrypted signature also contains the signature Algorithm and other details in DER format. So, use
asn1parseto find out the decrypted hash$ openssl asn1parse -inform DER -in stackexchange-signature-decrypted.bin 0:d=0 hl=2 l= 49 cons: SEQUENCE 2:d=1 hl=2 l= 13 cons: SEQUENCE 4:d=2 hl=2 l= 9 prim: OBJECT :sha256 15:d=2 hl=2 l= 0 prim: NULL 17:d=1 hl=2 l= 32 prim: OCTET STRING [HEX DUMP]:CACF0060E3899C13F5758307C2050FCA8BB575F8760CCD80A99402A51B193AF1Where,
asn1parse: diagnostic utility that can parse ASN.1 structures -inform: the input format. DER is binary format and PEM (the default) is base64 encoded -in: input fileSo the hash of certificate body is
CACF0060E3899C13F5758307C2050FCA8BB575F8760CCD80A99402A51B193AF1. Make a note of this -
Calculate the hash of the certificate body (excluding the RSA signature part)
# Extract the body part of certificate without RSA signature part $ openssl asn1parse -in stackexchange.crt -strparse 4 -out cert-body.bin # Calculate the hash of certificate body $ openssl dgst -sha256 cert-body.bin SHA256(cert-body.bin)= cacf0060e3899c13f5758307c2050fca8bb575f8760ccd80a99402a51b193af1Where,
asn1parse: diagnostic utility that can parse ASN.1 structures -in: input file -strparse: parse the contents octets of the ASN.1 object starting at specified offset -out: output file to place the DER encoded data intoWhy did we use offset 4?
We used4because the certificate body is at offset4. How do we know?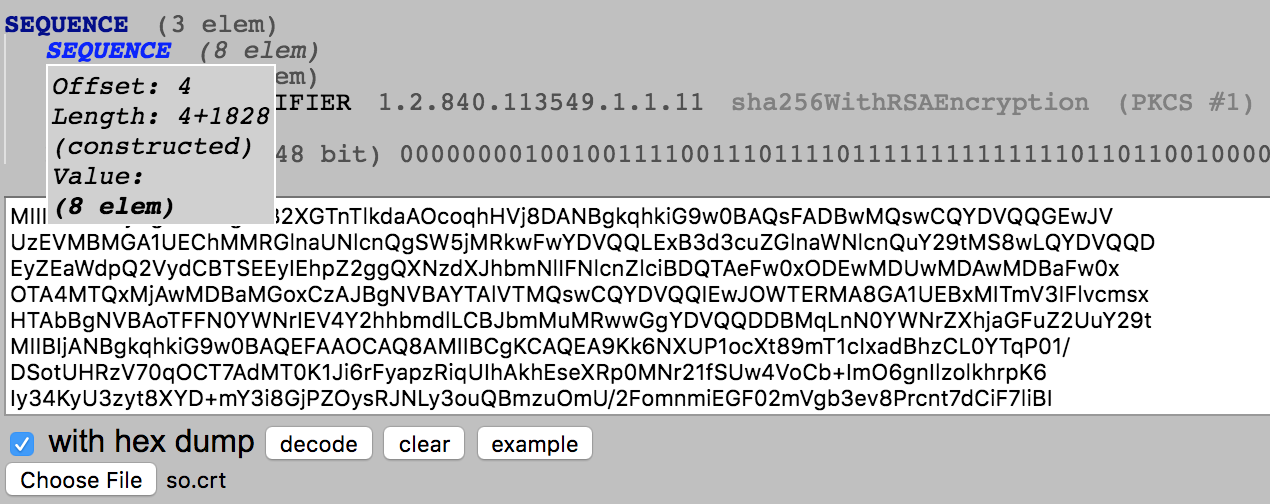
-
We can see that the hash of body
cacf0060e3899c13f5758307c2050fca8bb575f8760ccd80a99402a51b193af1matches the decrypted hashThis confirms that the contents of the certificate were not tampered and the issuer has really signed this certificate with their private key.
FAQ
[Q] Let’s say the website delivered a fake self signed certificate as issuer
certificate, is there a way to ensure we’re not being cheated?
[A] Sure, check the issuer in your server’s certificate and look up the Issuer on Google. For example, in this example, this is the issuer information from Server’s certificate:
$ openssl x509 -in stackexchange.crt -noout -issuer
issuer= /C=US/O=DigiCert Inc/OU=www.digicert.com/CN=DigiCert SHA2 High Assurance Server CA
If I search for "DigiCert SHA2 High Assurance Server CA". I can find a list
of certificates listed on the official website of
Digicert
Scroll down to the section that shows our listed certificate:
| Certificate Name | Information |
|---|---|
| DigiCert SHA2 High Assurance Server CA | Issuer: DigiCert High Assurance EV Root CA Valid until: 22/Oct/2028 Serial #: 04:E1:E7:A4:DC:5C:F2:F3:6D:C0:2B:42:B8:5D:15:9F Thumbprint: A031C46782E6E6C662C2C87C76DA9AA62CCABD8E Download |
The thumbprint published by Digicert is 160 bits and hence I believe it’s a SHA-1 hash.
Let’s create a SHA-1 hash of the Digicert certificate that we received from the server
$ openssl x509 -noout -fingerprint -sha1 -inform pem -in DigiCert_SHA2_High_Assurance_Server_CA.crt
SHA1 Fingerprint=A0:31:C4:67:82:E6:E6:C6:62:C2:C8:7C:76:DA:9A:A6:2C:CA:BD:8E
Now, we can be sure that the server didn’t produce some fake certificate and signature since the certificate matches the certificate published by official Digicert website.
[Q] Is there a simpler way of verifying the signature using openssl?
[A] Yes. We can let openssl do the verification for us:
$ openssl dgst -sha256 -verify issuer-pub.pem -signature stackexchange-signature.bin cert-body.bin
Verified OK
Where,
openssl dgst [-digest] [-help] [-c] [-d] [-hex] [-binary] [-r] [-out filename] [-sign filename] [-keyform arg] [-passin arg] [-verify filename] [-prverify filename] [-signature filename] [-hmac key] [-fips-fingerprint] [-rand file...] [-engine id] [-engine_impl] [file...]

-verify file    verify a signature using public key in file
-signature file signature to verify
-sha256         to use the sha256 message digest algorithm
file			File or files to digest
openssl dgst creates a SHA256 hash of cert-body.bin. It decrypts the
stackexchange-signature.bin using issuer-pub.pem public key. It verifies if
the decrypted value is equal to the created hash or not.
[Q] How does my browser inherently trust a CA mentioned by server?
[A] Your browser (and possibly your OS) ships with a list of trusted CAs. These
pre-installed certificates serve as trust anchors to derive all further trust
from.
More information:
- Mozilla Included CA Certificate List
- Chromium Security Root Certificate Policy
- Trusted root certificates in macOS High Sierra
Please don’t blame me if this link doesn’t work. Documentation team at this company has a bad habit of moving/deleting support documentation from time to time
- Security certificates in Opera
[Q] What if those pre-installed certificates expire?
[A] Root certificates do expire, but they tend to have exceptionally long
validity times (often about 20 years). In any case, your browser/OS update will
provide you fresh root certificates before the old ones expire.